
Ultimate Guide to Resolving Steam Cloud Sync Issues and Securing Game Progress

Ultimate Guide to Resolving Steam Cloud Sync Issues and Securing Game Progress
Quick Links
- Check The Steam Server Status
- Close Steam on Any Other Devices
- Enable Steam Cloud Synchronization
- Disable IPv6 in Windows
- Launch the Steam Client With Administrative Rights
- Verify the Integrity of Game Files
- Repair Your Steam Library Folder
Key Takeaways
- If you get a “Steam Cloud Sync” error when you launch a game, make sure your Steam account isn’t logged in on another device simultaneously.
- You can also turn on cloud sync to fix the problem.
- If you’re still having trouble, try turning off IPv6, running Steam as administrator, checking the Steam server status, verifying the integrity of game files, and repairing the Steam library folder.
Do you see a “Steam Cloud Sync” error when launching a game through Steam? Without cloud sync your game saves won’t backup properly, so let’s get that error patched right up before you lose any progress!
While we’ll focus on applying the fixes on Windows, many of the solutions will also help you troubleshoot the issue on your Mac.
Check The Steam Server Status
There’s no sense spending time solving a problem you can’t solve because the issue is with the Steam servers. Whether they’re down for maintenance or there’s an outright outage, cloud sync won’t work until they’re back up.
You can check the Steam servers using a general outage detector like Downdtector . Visit the site and search for “Steam” to check the status. You can also use Steam-centered tools like the status checker at SteamDB to check the status. Alternatively, you can also check the Steam X (formerly Twitter) account for any announcements about server outages.
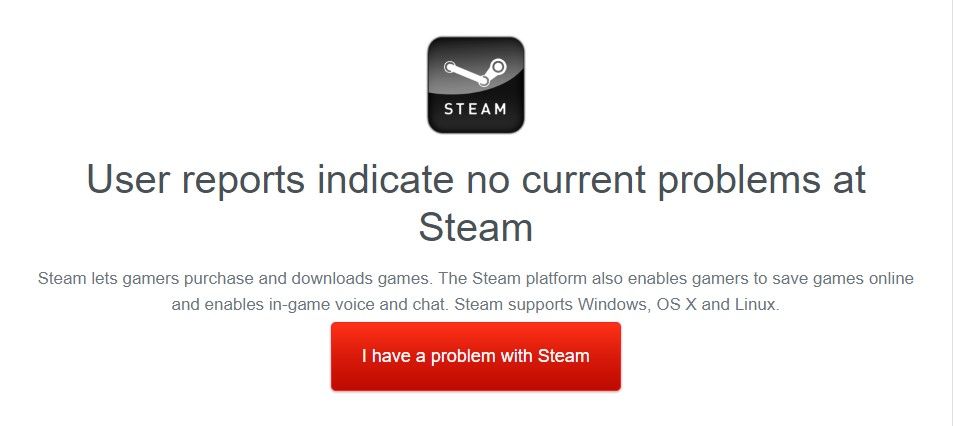
If you find that Steam servers are currently unavailable, then there’s nothing for you to do but wait. The cloud syncing error is Steam-wide problem, not an issue with your computer or network.
Close Steam on Any Other Devices
The “Steam Cloud Sync” error usually pops up when you try to use your Steam account on multiple devices simultaneously. For example, let’s say you’re playing a game through Steam on one computer where your progress is syncing properly. But then, without logging out of your Steam account on the first computer, you launch the Steam client on another computer where the cloud synchronization feature is turned off.
When Steam checks the cloud, it detects a discrepancy in your game progress. You might have reached a new level on the first computer, but because cloud sync was turned off on the other computer, none of your progress was saved there, and you’d still be stuck on the previous level. This can trigger the “Steam Cloud Sync” error message.
While you’ll see a “Launch Anyway” option, clicking it will cause you to lose any game progress made since the last sync. In this situation, the best course of action is to close the Steam client on the other device and continue playing on your primary device. However, if you still want to play the game on another device without losing progress, you need to enable syncing on that device in Steam settings.
If closing the secondary Steam client immediately solves your syncing issue, there’s a good chance that your cloud sync settings are, ironically, out of sync. Follow the steps in the next section on each of your devices to resolve the issue.
Enable Steam Cloud Synchronization
Cloud synchronization ensures that your progress is saved to the cloud. You might not realize there’s a specific setting in Steam you can toggle on and off. It must be enabled on all devices where you use the Steam client.
If the setting is disabled on a device, and you try to access the Steam client, you’ll see the error reappear.
To turn on Steam’s cloud synchronization feature, open the Steam client on your computer. Then, click the “Steam” option in the top-left corner and choose “Settings” from the menu that appears.

In the Steam Settings window that appears, choose “Cloud” from the left sidebar and toggle on the “Enable Steam Cloud” toggle.
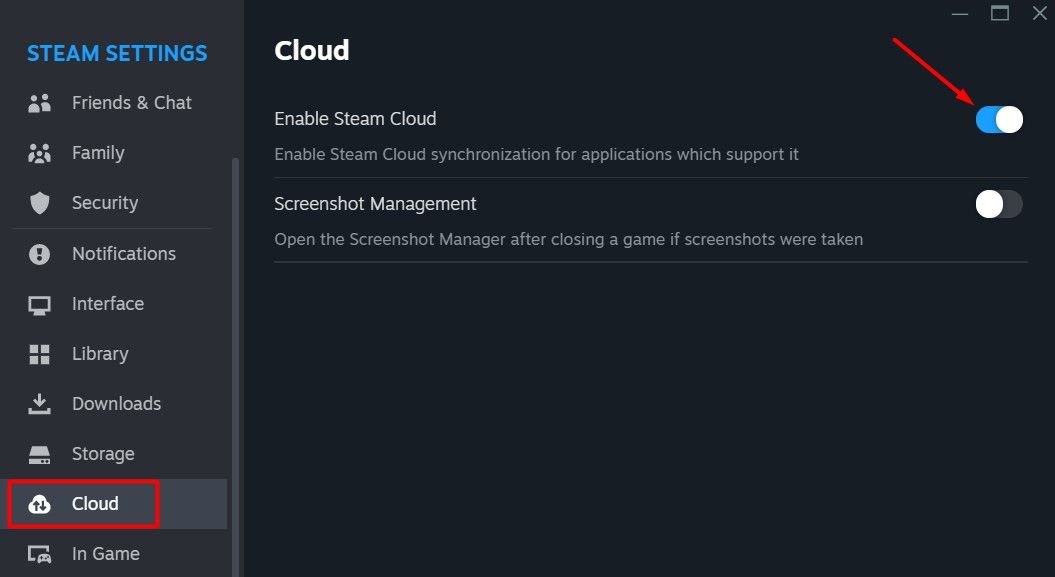
And that’s all! Give Steam some time to properly load your synced data. The load time will depend on the amount of game progress you have saved on other devices where you’re logged into Steam.
Disable IPv6 in Windows
It’s easy to focus solely on the Steam client as the source of the syncing problem. For some users, however, the issue seems to be related to the way the Steam client handles IPv6 to IPv4 fallback and related issues. When the fallback fails, the cloud syncing fails.
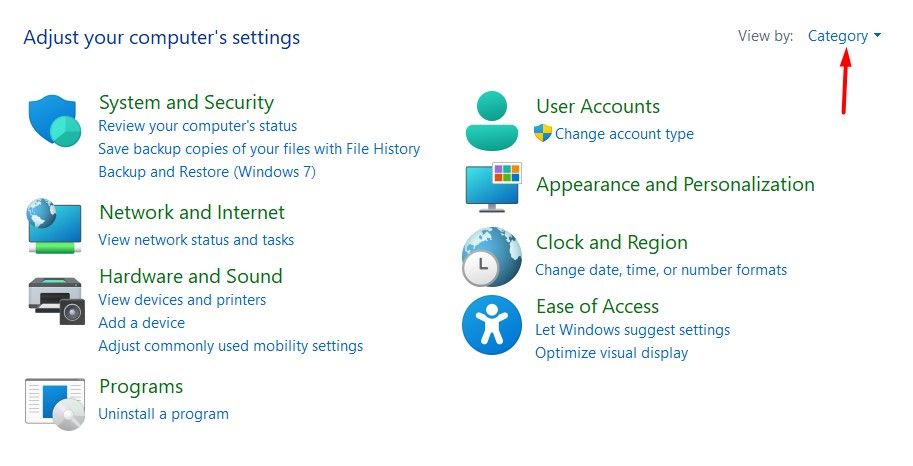
If you’re consistently getting cloud sync errors and the other solutions presented here fail, you should test out disabling IPv6 on your device. To do this on your Windows computer, open the Control Panel and set “View By” to “Category.”
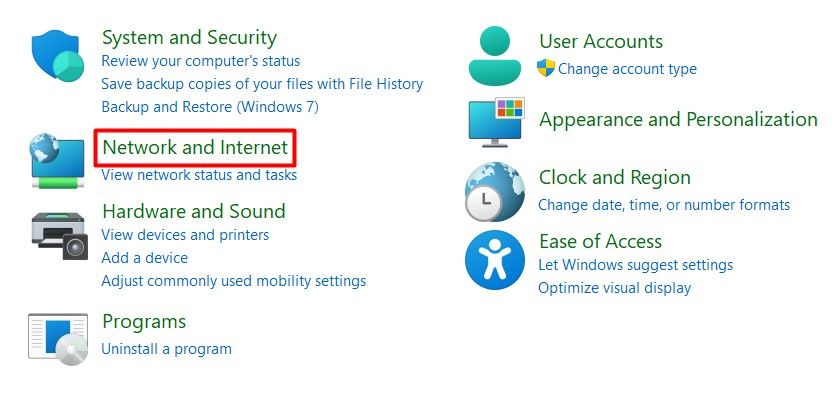
Choose “Network and Internet.”
Select “Network and Sharing Center.”

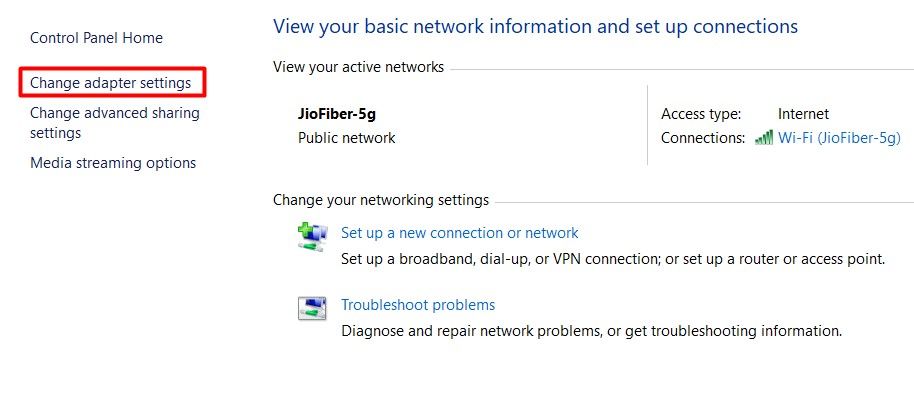
On the left sidebar, choose “Change Adapter Settings.”
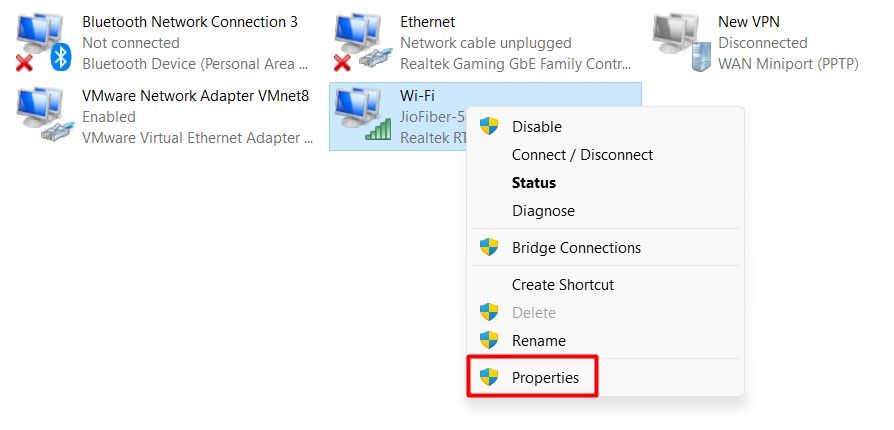
In the Network Connections window that appears, right-click your connection and choose “Properties.”
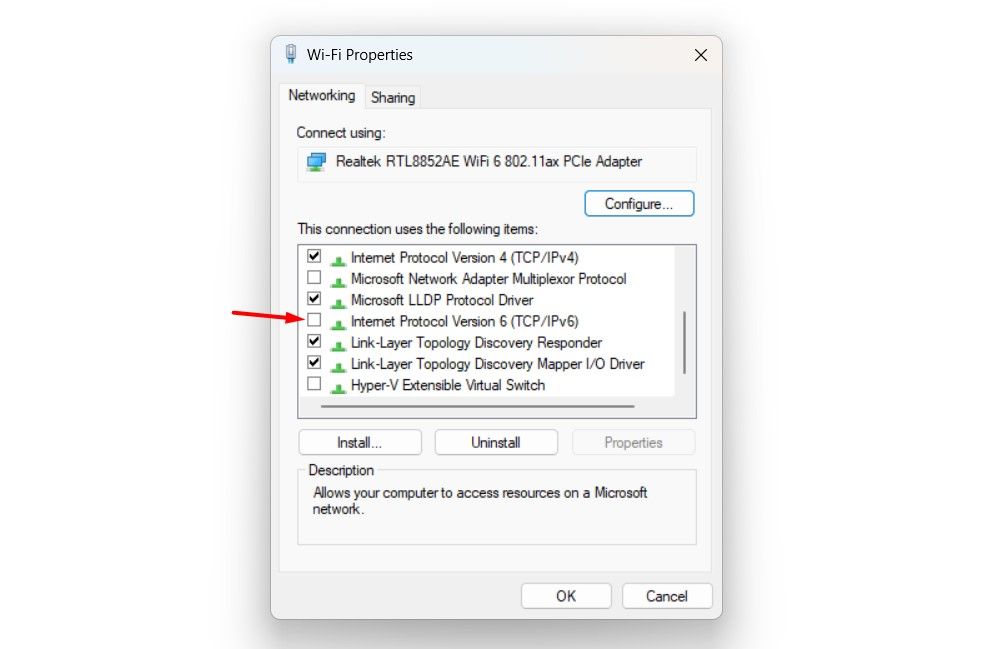
Uncheck the “Internet Protocol Version 6 (TCP/IPv6)” box. Then, click “OK” to save the changes.
After that, restart your computer , launch the Steam client, and check if the problem persists.
Launch the Steam Client With Administrative Rights
It’s possible that Steam might be unable to sync data properly due to insufficient administrative permissions. To avoid this in the future, you can run Steam as administrator .
To run the Steam client as an administrator, launch the Start menu. Then, in the search bar, type “Steam” and choose the “Run as Administrator” option.
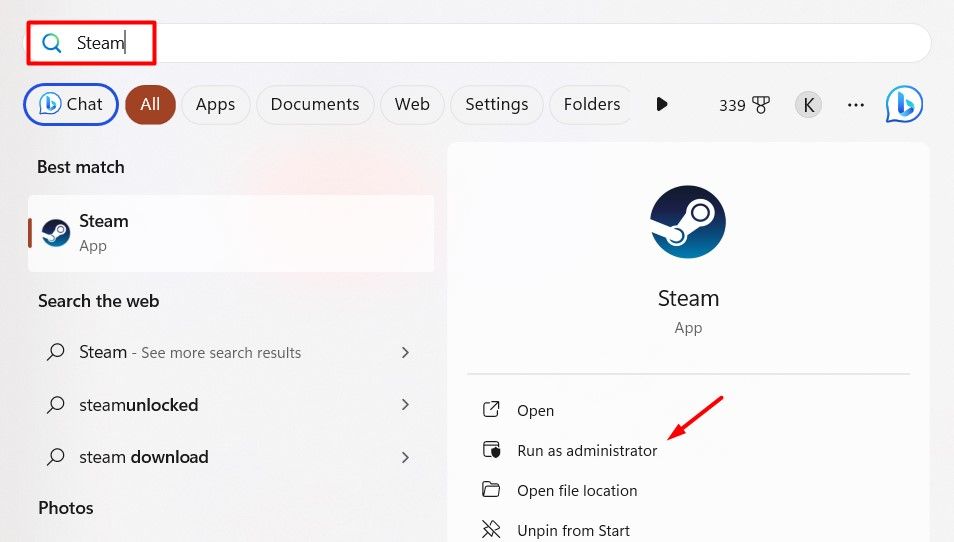
Click “Yes” to the User Account Control box that pops up. Next, try playing the game again and see if the error still appears. If it does, then there’s likely corruption in the game files themselves.
Verify the Integrity of Game Files
It’s possible for game files to become corrupted during sudden Steam client closures or malware attacks. This can lead to different issues, including the “Steam Cloud Sync” error. You can often fix corrupt files by verifying the integrity of your game files.
When you verify file integrity, Steam compares the files on your computer to the official copies on its servers. If it finds any missing or corrupted files, it automatically downloads and replaces them with the correct versions.
It’s very easy to verify the integrity of game files. To do this, launch the Steam client and click the “Library” tab at the top.

On the left sidebar, right-click on the game causing the error, and choose “Properties.”

Choose “Installed Files” from the left sidebar and click the “Verify Integrity of Game Files” option on the right.
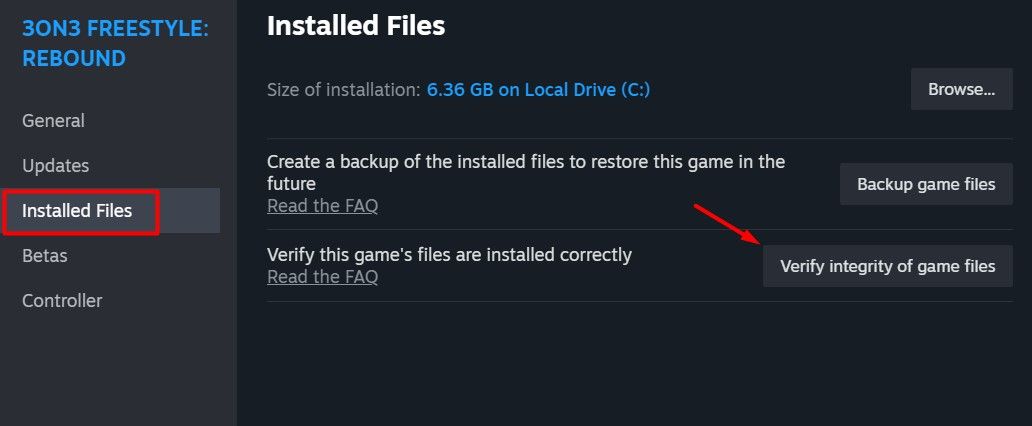
The process might take a while, depending on the game’s size. Once completed, restart Steam and relaunch the game to test if the issue has been resolved.
Repair Your Steam Library Folder
Steam stores all downloaded game data in the Library folder. If the folder gets corrupted, Steam might not be able to sync your data properly, leading to the “Steam Cloud Sync” error.
You can get rid of the corrupted files using the Steam built-in repair feature. To use this feature, open the Steam client, click “Steam” in the top-left corner, and choose “Settings.” Then, in the Steam Settings window, select “Storage” from the left sidebar, click the three dots next to the storage bar, and choose “Repair Library.”
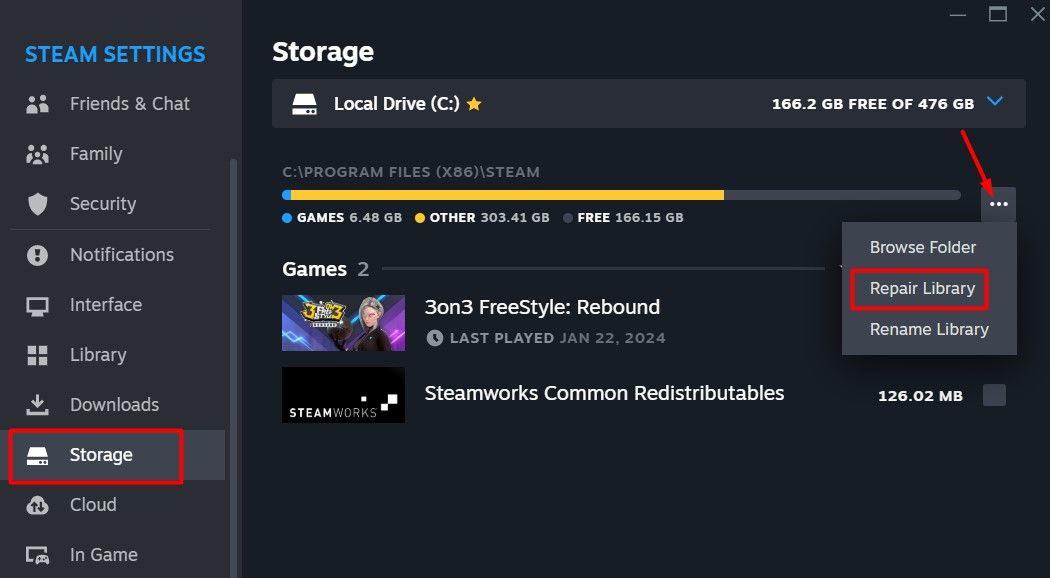
Click “Yes” to the UAC warning that shows up. Once the repair process is complete, click the “Close” button.
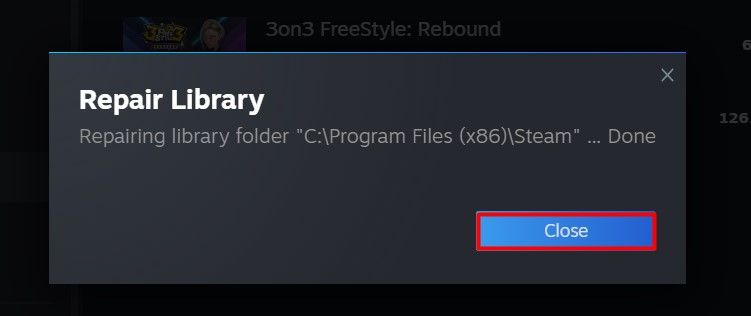
After that, relaunch the Steam client, and you will hopefully no longer face the issue.
Hopefully these tips have helped you resolve the “Steam Cloud Sync” error once and for all. Once the issue is resolved and you can focus on fun instead of troubleshooting, check out some of our favorite hidden Steam features to boost your gaming experience!
Also read:
- [New] 2024 Approved Youtube Shorts Earnings Guide Must-Knows & Future Potential
- [Updated] Follower Fliers Best Personal Drone Tech
- [Updated] In 2024, Compreranimal Webcam Tutorial Achieve Excellent Video Quality
- [Updated] Revitalizing Screenshots - The Ultimate Top 10 iPhone/Android Sticker Tools
- Amazon Devices Showdown: Kindle vs Fire Tablet – What Sets Them Apart?
- Experience NickWatch's Grand American Arrival, Aligned with The Spectacular Atmosphere of Kids' Choice Award Night!
- Experience the Ultimate Karaoke Party Without Breaking the Bank: Karaoke USA Review – Top Fun Below $150!
- How Well Does the Latest iPhone 14 Stack Up? Insights From ZDNet's In-Depth Analysis.
- In 2024, Leaping From Low Quality to HDRI Mastery - Your Ultimate Guide
- Leading Extended Desktop Pad Reviews: Choose the Right One
- Maximize Efficiency: Integrating ABBYY & Blue Prism in Your Automation Hub Webinar
- Prime Day Special: Score Amazing Deals on Cutting-Edge Samsung Devices Still Available!
- Reimagining VR's Uncharted Territories
- The Complete Netatmo Weather Station Review: Blending Elegant Design with User-Friendly App Integration
- Top 5 Factors to Evaluate When Choosing Your Next Fitness Tracker
- Ultimate Arlo Doorbell Guide: Comprehensive Review of Dual-Function Security Cameras and Alarms
- What Is a SIM Network Unlock PIN? Get Your Lava Yuva 3 Phone Network-Ready
- Title: Ultimate Guide to Resolving Steam Cloud Sync Issues and Securing Game Progress
- Author: Scott
- Created at : 2024-12-04 09:46:29
- Updated at : 2024-12-11 01:56:25
- Link: https://buynow-info.techidaily.com/ultimate-guide-to-resolving-steam-cloud-sync-issues-and-securing-game-progress/
- License: This work is licensed under CC BY-NC-SA 4.0.